I have quite a few Voodoo Vixen dresses. I will try and post on each with a relatively decent picture, which I can do now I have actually fixed the mirror to the bedroom wall (its only taken me 5 years!)
This is probably the one I wear the most. Its the Tilly dress, which of course is now available in plus sizes. I wear their 1XL (previously 2XL as they changed their sizing) This is pretty much equivalent to a UK 18-20, or a 42-37.5-48 if you want to know my measurements.
When I first got it, I was a bit disappointed. It was a bit gapey, even though I am not particularly well endowed in the chest department (I'm a C cup on a good day). The waist seemed too low and it just didn't fit well. (I am short waisted though, it is worth pointing out)
I thought I'd try to remedy the gape by just sewing up the front (The buttons are not functional as there is a zip up the side, so I'm not entirely sure why it needs to open at the front)
Bingo! Perfect fit. That was all it needed - 5 minutes of hand sewing the left side of the dress to the right side. No more gape and it seems to have made it fit better at the waist. Hurrah!
So sometimes I wear a belt. Others not. Also some days I bother to brush my hair. Clearly that has not happened here...
The great thing about VV dresses, is the fabric. You don't always get this in the repro-vintage market. Some brands use really cheap fabric and you can feel it.
The quality of Tilly is excellent - what you get is a stretch cotton that is moderately weighty, so it feels like its supporting you. I always feel modestly covered in a VV dress - nothing is hanging out or about to escape. They also tend to have matching cardis if you feel so inclined.
I did try to take a couple of selfies, but Noah was determined to get in on the action LOL
_ _ _ _ _ _ _ _ ~*~*~*~*~* Bagmaking, Dressmaking, Plus Size Fashion & tales of everyday life ~*~*~*~*~ _ _ _ _ _ _ _ _
Showing posts with label 1950's. Show all posts
Friday, 27 February 2015
Thursday, 8 May 2014
What the! Two posts in one week?! It must be deadline time!
So what have I been beavering away at in secret for the last few months (other than bags of course)?
Dolly clothes. For a competition. http://www.hellbunnyrag.com/win-me.php
I immediately knew I had to enter when my hell bunny rag arrived - one problem though - no doll to dress.
I found a Liv doll on ebay, made a few tiny modifications (painted her
lips and eyebrows - her eyes are a bit too green (mine are brown) but close enough), and got to work on a coat - not strictly within the
rules as they are after dresses - but in my head I wanted to do a coat
so that's what I started with! I made some little fit patterns first then made paper patterns for the coat using my fit patterns.
I used felt and trimmed it with
black ribbon.
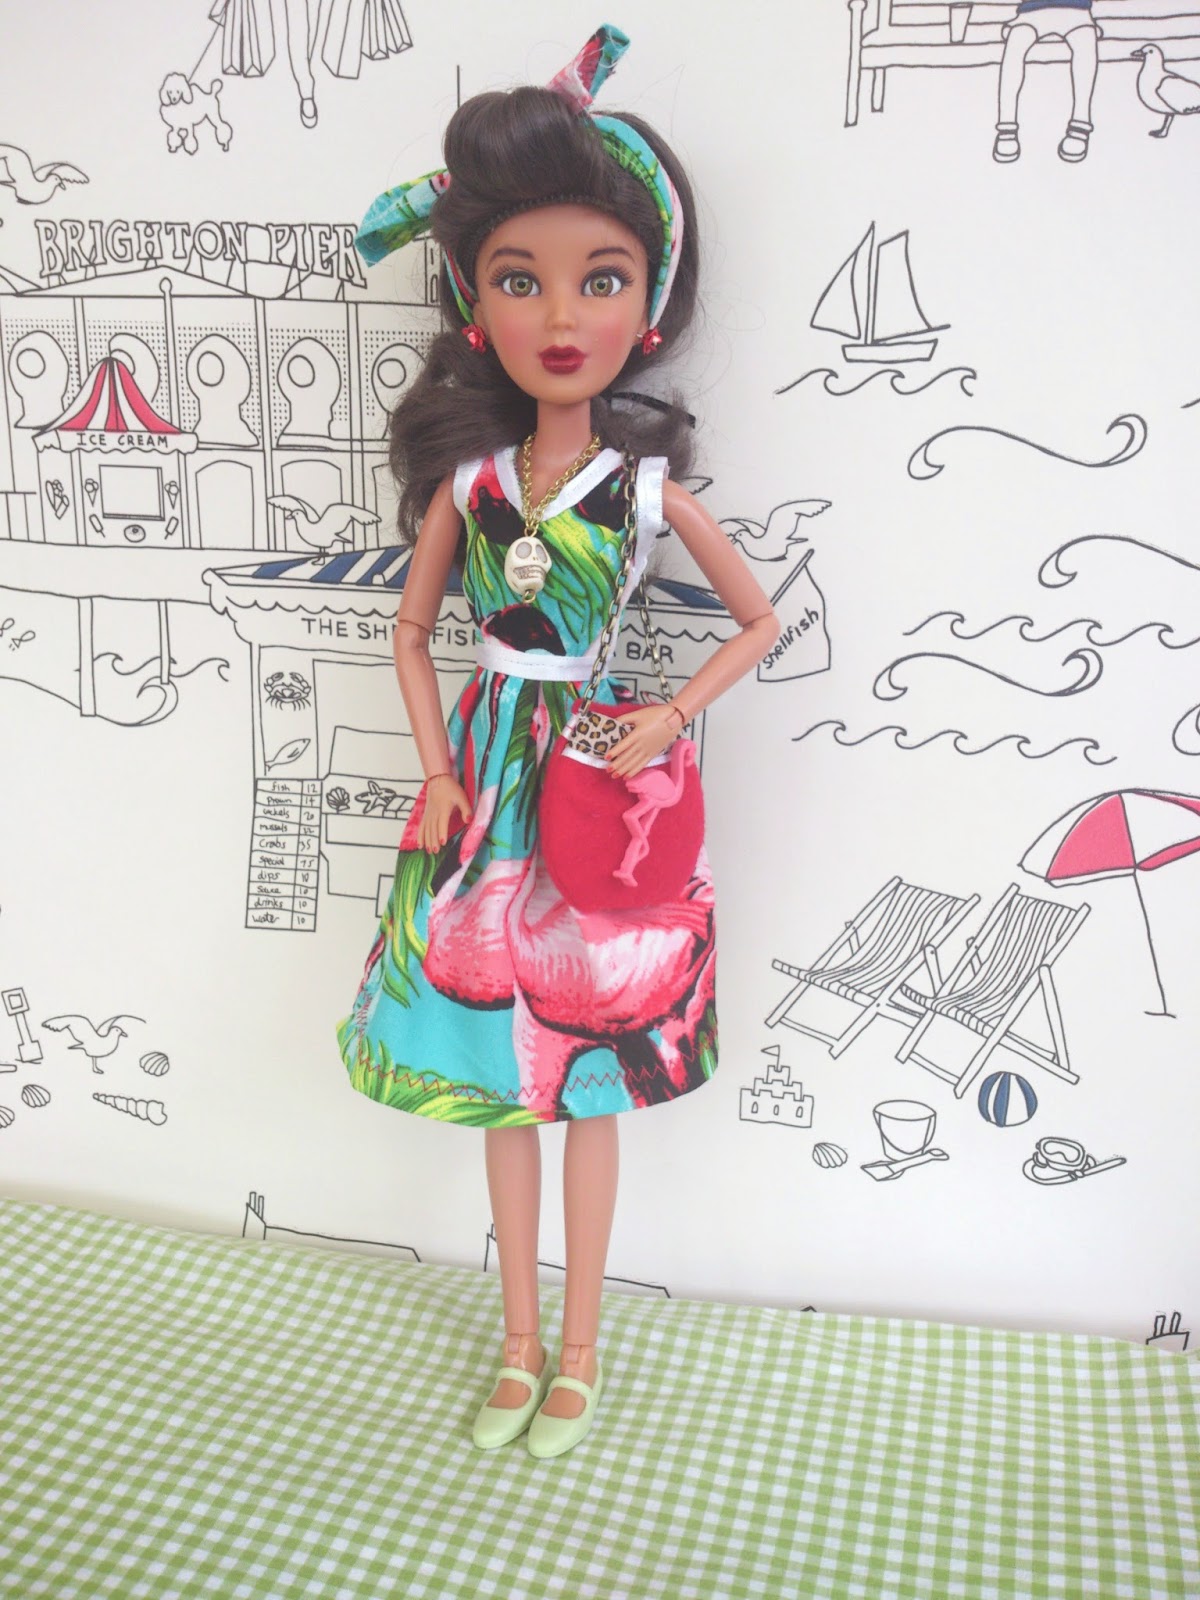
'Lindy' Dress #1 was a copy of my Sassy dress in tropical - as I have no tropical fabric in my stash I went for fruity instead, and made her a little net underskirt.
Last was the Larissa Flamingos dress (Dress #2) I knew I wanted to use some of my favourite flamingo fabric for this!
I also made a couple of mini bags and some jewellery to accessorise. I'm pretty pleased with how she came out.
Noah and I got some wallpaper samples from B&Q to use for backgrounds, and I snapped her this afternoon. I'm not a great photographer unfortunately but I think you can get the gist!
Next on the
list - Handmade by London - the Flora dress. Its all cut out ready for
the sewing machine! Can I meet that deadline too?!
Labels:
1950's
,
competition
,
dolls clothes
,
Hell Bunny
,
patterns
,
retro
,
Sewing
Tuesday, 29 April 2014
Actual craft report today!
I have been doing stuff - its just that I've been doing it secretly. Its my mums 70th birthday tomorrow, so I've been beavering away making here a Kennedy Bag which is a satchel style bag with faux buckles (it has a mag snap fastening) and a very bright fabric! I chose the 'cats in the flower garden' fabric because she likes, well, cats and gardening!
I'm hoping she likes it because shes certainly not the reserved type! It is an easy pattern to follow, but just a little bit finicky - lots of stuff to cut out - and I am short on time so this took me quite a while! My first time putting on little bag feet (was so easy I'm putting them on everything now!) and I also added a removable internal base which has a little more rigidity to it.
The second bag I've made this month is the 'Wordy Ladies' bag for my friend Nic. She needs something to go with her dress to attend a wedding. Its a Lindy Bop Audrey dress, which is gorgeous and classy (I have one in black) and plain midnight blue, so she wanted something dramatic to accessorise. She also wanted a budgety bag (i.e one that is quick to make - time is money!) that would fit the basics. We went through my stash and I suggested the fabric used for the bag below:
I just used a half circle screw on frame for this - I have ordered a silver frame but its not here yet so the bronze is temporary. I used the same pattern I made up for my kitty bag which was the practice run for the wedding bag (see below) but stabilised this with compressed fleece so that it can stand up on a table. Also included the piping - I bloody love piping - and finished with a bow. She seems pleased :)
Finally - I don't believe I ever posted my commissioned bag - this was made for an adorable lady called Emma who is getting married in July. She is a designer, so she had a very specific set of requirements. Apparenently I met those! Can't wait to see here wedding photos :)
I have been doing stuff - its just that I've been doing it secretly. Its my mums 70th birthday tomorrow, so I've been beavering away making here a Kennedy Bag which is a satchel style bag with faux buckles (it has a mag snap fastening) and a very bright fabric! I chose the 'cats in the flower garden' fabric because she likes, well, cats and gardening!
I'm hoping she likes it because shes certainly not the reserved type! It is an easy pattern to follow, but just a little bit finicky - lots of stuff to cut out - and I am short on time so this took me quite a while! My first time putting on little bag feet (was so easy I'm putting them on everything now!) and I also added a removable internal base which has a little more rigidity to it.
The second bag I've made this month is the 'Wordy Ladies' bag for my friend Nic. She needs something to go with her dress to attend a wedding. Its a Lindy Bop Audrey dress, which is gorgeous and classy (I have one in black) and plain midnight blue, so she wanted something dramatic to accessorise. She also wanted a budgety bag (i.e one that is quick to make - time is money!) that would fit the basics. We went through my stash and I suggested the fabric used for the bag below:
I just used a half circle screw on frame for this - I have ordered a silver frame but its not here yet so the bronze is temporary. I used the same pattern I made up for my kitty bag which was the practice run for the wedding bag (see below) but stabilised this with compressed fleece so that it can stand up on a table. Also included the piping - I bloody love piping - and finished with a bow. She seems pleased :)
Finally - I don't believe I ever posted my commissioned bag - this was made for an adorable lady called Emma who is getting married in July. She is a designer, so she had a very specific set of requirements. Apparenently I met those! Can't wait to see here wedding photos :)
Monday, 20 January 2014
A new year, a new post.
A new year, a new post. Sewing took a back seat over the christmas period, but I'm back now. The business is still in business, although I have so many things I want to make for myself I don't know when I'm going to fit in making bags for other people!
Wouldn't it be nice to have a whole day to yourself? A special 8th day that only exists for you to get stuff done in and you don't have to worry about the day job, the children, the spouse, the house. Everyone else skips straight to the next week!
So anyway, back to the real world: this is my current project. For me.
I want to wear it on Saturday for my anniversary meal with hubby (its now Monday), but it probably won't be complete from a finishing point of view.
Its actually meant as an evening gown for a ball next month http://www.cherryandruby.co.uk/NeonMoon/ValentinesBall.html, but without the underbust corset and the petticoat and the gloves I have lined up for that event, I think its a perfectly wearable restaurant dress. Bit busy maybe!
I chose Vogue 2903 for my evening gown (a 1957 design) http://voguepatterns.mccall.com/v2903-products-4894.php?page_id=850 - its as close to what I have in my mind as I could get. Its more calf/ankle/tea length than the illustration suggests - her thighs are disproportionately long!.
I went for the Katie Kandles black peacock fans fabric - first hurdle - ordered 8 metres but Fabricland rang me to tell me there was only 5 metres left! I ordered it anyway, and managed to squeeze it all in by also utilising the 3/4 metre I had left in my stash from bag-making. There is a mixture of pattern
directions (feathers up and feathers down) but I decided that its not that obvious because the pattern is so busy.
I do have issues with the sizing. I very carefully noted my measurements and adjusted the pattern accordingly (normally wear a 16, but measured as size 20 with 22 waist so cut the pattern as a 20 from the waist up and a 22 from the waist down) I'm both short and fat waisted. Unfortunately after my adjustments it was too big around the waist. Gah! I had to take it in, and have a large seam allowance at the shoulders for it to sit properly. (I'm shorter waisted than I thought!)
I also decided against sewing the full folds in as per the pattern. The nature of the print means that you don't really get the effect, and having tried to do a full fold (There are 6) - the skirt didn't sit how I wanted it to. So that was unpicked.
OMG this dress is seriously hard work!
Its finished as far as construction goes, but there's still a long way to go - removing the basting stitches, hemming, and seam binding which is going to take aaagges.
I had to re-do the sleeves twice (try on, sigh in dismay, unpick, snip a bit off, re-baste, try on and repeat) because they were just too puffy. I don't mind puffed sleeves, in fact I quite like them, but not with an off-the-shoulder dress, because the sleeve doesn't sit on the shoulder but below it, so too much puff just looks wierd, especially for someone with bigger arms. I've gone for two folds instead of gathering. I actually don't think they were ever meant to be gathered, just 'eased' but there was so much fabric I had no choice.
The yoke section is more complicated that anything i've done before, because there is an inner and outer section, and the sleeve is connected to both. I can't even begin to explain quite how that works, or why it's necessary frankly, but I just did what I was told! They didn't half make life difficult for
themselves in the 50's! There was a bit of hand sewing involved because it was too tricky to get the machine in all the corners.
Its shown with a two-layer net petticoat underneath for a small amount of flounce. It is 'bigger' when I wear it - but of course Kirstie (my dressmaking form) has no legs...The petticoat is from dreampetticoats - I ordered a 30" which is a length hard to get off-the-peg - but actually I'm starting to wish I'd bought a 32" with a satin trim (and an underskirt 'cos boy its itchy ) Too late now though.
Wouldn't it be nice to have a whole day to yourself? A special 8th day that only exists for you to get stuff done in and you don't have to worry about the day job, the children, the spouse, the house. Everyone else skips straight to the next week!
So anyway, back to the real world: this is my current project. For me.
I want to wear it on Saturday for my anniversary meal with hubby (its now Monday), but it probably won't be complete from a finishing point of view.
Its actually meant as an evening gown for a ball next month http://www.cherryandruby.co.uk/NeonMoon/ValentinesBall.html, but without the underbust corset and the petticoat and the gloves I have lined up for that event, I think its a perfectly wearable restaurant dress. Bit busy maybe!
I chose Vogue 2903 for my evening gown (a 1957 design) http://voguepatterns.mccall.com/v2903-products-4894.php?page_id=850 - its as close to what I have in my mind as I could get. Its more calf/ankle/tea length than the illustration suggests - her thighs are disproportionately long!.
I went for the Katie Kandles black peacock fans fabric - first hurdle - ordered 8 metres but Fabricland rang me to tell me there was only 5 metres left! I ordered it anyway, and managed to squeeze it all in by also utilising the 3/4 metre I had left in my stash from bag-making. There is a mixture of pattern
directions (feathers up and feathers down) but I decided that its not that obvious because the pattern is so busy.
I do have issues with the sizing. I very carefully noted my measurements and adjusted the pattern accordingly (normally wear a 16, but measured as size 20 with 22 waist so cut the pattern as a 20 from the waist up and a 22 from the waist down) I'm both short and fat waisted. Unfortunately after my adjustments it was too big around the waist. Gah! I had to take it in, and have a large seam allowance at the shoulders for it to sit properly. (I'm shorter waisted than I thought!)
I also decided against sewing the full folds in as per the pattern. The nature of the print means that you don't really get the effect, and having tried to do a full fold (There are 6) - the skirt didn't sit how I wanted it to. So that was unpicked.
OMG this dress is seriously hard work!
Its finished as far as construction goes, but there's still a long way to go - removing the basting stitches, hemming, and seam binding which is going to take aaagges.
I had to re-do the sleeves twice (try on, sigh in dismay, unpick, snip a bit off, re-baste, try on and repeat) because they were just too puffy. I don't mind puffed sleeves, in fact I quite like them, but not with an off-the-shoulder dress, because the sleeve doesn't sit on the shoulder but below it, so too much puff just looks wierd, especially for someone with bigger arms. I've gone for two folds instead of gathering. I actually don't think they were ever meant to be gathered, just 'eased' but there was so much fabric I had no choice.
The yoke section is more complicated that anything i've done before, because there is an inner and outer section, and the sleeve is connected to both. I can't even begin to explain quite how that works, or why it's necessary frankly, but I just did what I was told! They didn't half make life difficult for
themselves in the 50's! There was a bit of hand sewing involved because it was too tricky to get the machine in all the corners.
Its shown with a two-layer net petticoat underneath for a small amount of flounce. It is 'bigger' when I wear it - but of course Kirstie (my dressmaking form) has no legs...The petticoat is from dreampetticoats - I ordered a 30" which is a length hard to get off-the-peg - but actually I'm starting to wish I'd bought a 32" with a satin trim (and an underskirt 'cos boy its itchy ) Too late now though.
Labels:
1950's
,
dressmaking
,
Katie Kandles
,
Off-the-shoulder
,
peacock fans
,
Sewing Patterns
,
V2903
,
vintage
,
Vogue
Subscribe to:
Posts
(
Atom
)